Surface devices, known for their sleek design and powerful performance, are an excellent choice for those who value portability and efficiency. However, like any device with limited storage, your Surface laptop or tablet can gradually accumulate unnecessary files, leading to a decrease in available SSD space. This article will guide you on how to deep clean your Surface SSD, free up valuable storage space, and help your device run more smoothly.
Understanding Surface Devices and SSD Storage
Microsoft’s Surface devices come equipped with Solid State Drives (SSDs) as the primary storage solution. SSDs are faster than traditional Hard Disk Drives (HDDs), providing quicker boot times, faster file access, and an overall improved user experience. However, as your Surface device continues to be used, Windows and various applications tend to consume more storage space over time. This is primarily due to system updates, cached files, temporary files, and even old backups.
How Windows Consumes SSD Space Over Time
Windows operating systems, particularly Windows 10 and Windows 11, manage storage automatically, but this can sometimes result in the accumulation of files you don’t need. Here are some common ways in which storage gets used up:
- Windows Updates: Every time Windows updates, it downloads new files, temporary installation files, and backup copies of older system versions. Over time, these files can take up significant space.
- Temporary Files and Caches: Applications, browsers, and even Windows itself store temporary files for faster operation. While helpful, they can pile up and waste precious storage space.
- System Restore Points: Windows creates restore points automatically as a backup in case of system failure. While useful, restore points can consume a large chunk of your SSD, especially if not cleaned up periodically.
- Old Backup Files: If you use the built-in backup features, old versions of your backup files may be lingering around, eating up your disk space without offering much benefit.
Steps to Deep Clean Your Surface SSD
If you’re noticing that your Surface device is slowing down or you’re running out of storage, performing a deep clean can significantly help reclaim SSD space. Here’s how to do it:
1. Use Windows’ Built-in Storage Sense
Windows has a handy tool called Storage Sense that automatically helps you manage and clean up files. To enable it:
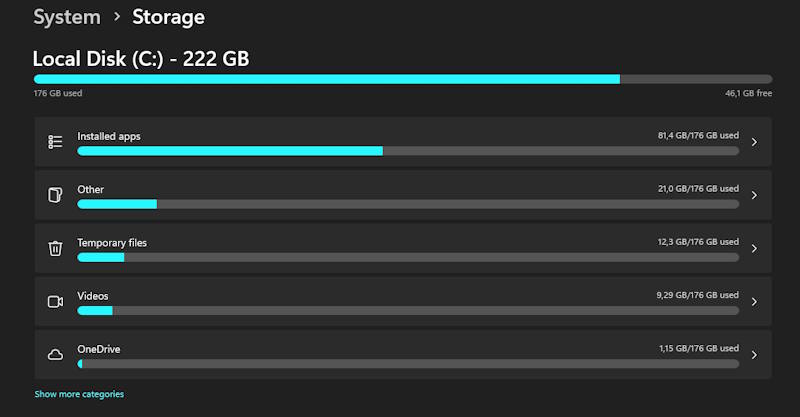
- Go to Settings > System > Storage.
- Under Storage Sense, toggle it on. You can customize how often it runs and what files it cleans, including temporary files, previous Windows installations, and system error memory dump files.
- You can also run a manual clean-up by clicking Free up space now under the Storage settings, where you’ll be able to delete system files, old Windows updates, and more.
2. Delete Temporary and Cached Files
Over time, browsers and applications store temporary files, which can add up. To clear these:
- Open the Start Menu, search for Disk Cleanup, and select it.
- Choose the drive you want to clean (usually the C: drive).
- Under the “Disk Cleanup” window, select the types of files you want to delete, such as Temporary files, System created Windows Error Reporting, and Windows Update Cleanup.
- Click OK and then Delete Files.
3. Remove Old Restore Points
System restore points are useful, but they can take up a lot of storage. To remove old restore points:
- Press Win + R, type
sysdm.cpl, and press Enter. - In the System Properties window, go to the System Protection tab.
- Under Protection Settings, select your system drive (usually C:) and click Configure.
- Under the Disk Space Usage section, you can delete old restore points or even turn off system protection if you don’t rely on restore points.
4. Uninstall Unnecessary Applications
Unwanted apps and programs can also consume SSD space. Review your installed apps and remove those you no longer use:
- Go to Settings > Apps > Apps & features.
- Browse through the list and click on any app you no longer need, then click Uninstall.
5. Use Third-Party Tools for Deeper Cleanup
If you want a more thorough cleaning, third-party tools like CCleaner or CleanMyPC can help remove junk files, clear browser caches, and even identify duplicate files.
6. Offload Files to External Storage
If you’re still running low on space after cleaning, consider moving large files such as videos, music, or old documents to an external hard drive or cloud storage. This will free up valuable SSD space while still keeping your important files accessible.
Reclaiming More SSD Space: Consider Upgrading Your Storage
If you’ve done everything above and still find yourself running low on space, you may want to consider upgrading your Surface device’s storage. While most Surface devices come with built-in SSDs that are not user-upgradable, there are external SSD options you can use for expanded storage. Devices like the Surface Pro and Surface Laptop offer USB-C ports, which can be used to connect an external SSD for additional storage.
Conclusion
Deep cleaning your Surface SSD is an excellent way to reclaim valuable space and ensure that your device continues to perform at its best. By regularly managing storage, removing unnecessary files, and utilizing Windows’ built-in tools, you can maintain an optimal experience with your Surface device. And if you’re still running out of space, consider using external storage or upgrading your device to get more out of your Surface’s performance.